How to Add or Remove "Primary NVMe Idle Timeout" from Power Options in Windows 10
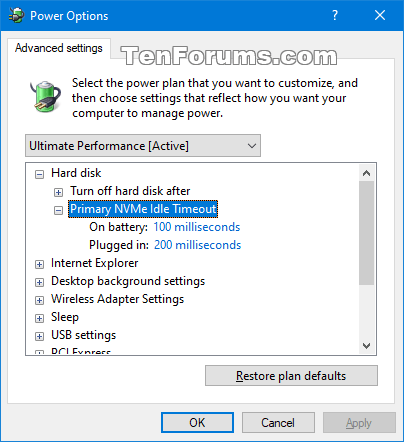
The Primary NVMe Idle Timeout setting in Power Options specifies the amount of time the NVMe device must be idle before transitioning to the primary non-operational power state.
By default, Primary NVMe Idle Timeout is set to these values for the following power plans:
Power Plan On battery Plugged in Balanced 100 milliseconds 200 milliseconds High Performance 200 milliseconds 200 milliseconds Power Saver 100 milliseconds 100 milliseconds Ultimate Performance 100 milliseconds 200 milliseconds
This tutorial will show you how to add or remove the Primary NVMe Idle Timeout setting under Hard disk in Power Options for all users in Windows 10.
You must be signed in as an administrator to add or remove this setting in Power Options.
Contents
- Option One: Add or Remove "Primary NVMe Idle Timeout" in Power Options using Command Prompt
- Option Two: Add or Remove "Primary NVMe Idle Timeout" in Power Options using REG file
EXAMPLE: "SEC NVMe Idle Timeout" in Power Options
1 Open an elevated command prompt.
2 Type the command below you want to use into the elevated command prompt, and press Enter.
(Add)
REG ADD HKLM\SYSTEM\CurrentControlSet\Control\Power\PowerSettings\0012ee47-9041-4b5d-9b77-535fba8b1442\d639518a-e56d-4345-8af2-b9f32fb26109 /v Attributes /t REG_DWORD /d 2 /f
OR
(Remove - default)
powercfg -attributes SUB_DISK d639518a-e56d-4345-8af2-b9f32fb26109 +ATTRIB_HIDE
3 You can now close the elevated command prompt if you like.
The downloaded .reg files below will modify the DWORD value in the registry key below.
HKEY_LOCAL_MACHINE\SYSTEM\CurrentControlSet\Control\Power\PowerSettings\0012ee47-9041-4b5d-9b77-535fba8b1442\d639518a-e56d-4345-8af2-b9f32fb26109
Attributes DWORD
1 = Remove
2 = Add
1 Do step 2 (add) or step 3 (remove) below for what you would like to do.
A) Click/tap on the Download button below to download the file below, and go to step 4 below.
Add_Primary_NVMEe_Idle_Timeout_to_Power_Options.reg
Download
This is the default setting.
A) Click/tap on the Download button below to download the file below, and go to step 4 below.
Remove_Primary_NVMEe_Idle_Timeout_from_Power_Options.reg
Download
4 Save the .reg file to your desktop.
5 Double click/tap on the downloaded .reg file to merge it.
6 When prompted, click/tap on Run, Yes (UAC), Yes, and OK to approve the merge.
7 You can now delete the downloaded .reg file if you like.
That's it,
Shawn Brink
Related Tutorials
- How to Change Power Plan Settings in Windows 10
- How to Turn Off Hard Disk After Idle in Windows 10
- How to Add or Remove 'Turn off hard disk after' from Power Options in Windows
- How to Add or Remove 'SEC NVMe Idle Timeout' from Power Options in Windows 10
- How to Add 'AHCI Link Power Management - HIPM/DIPM' to Power Options in Windows
- How to Add or Remove 'AHCI Link Power Management - Adaptive' from Power Options in Windows
Add Primary NVMe Idle Timeout to Power Options in Windows 10

Add Primary NVMe Idle Timeout to Power Options in Windows 10
How to Add or Remove 'Primary NVMe Idle Timeout' from Power Options in Windows 10Published by Shawn BrinkCategory: Performance & Maintenance
28 Dec 2021
Tutorial Categories


Related Discussions


 Quote
Quote